![]()
![]()
 Create
an Inbound Exit Batch
To create your own Exit batch to apply to the system, go to
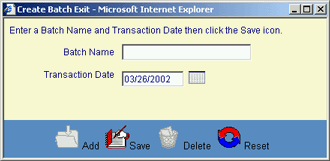
the Apply Exit Records screen under the Inbound tab and click on the Add
icon located in the function bar. You will be presented with a new window where
you will enter the name of the batch you are creating (up to 25 alphanumeric
characters) and the transaction date. This date defaults to the current date,
but you can modify it. It will be the exit date assigned to all borrowers being
exited in the batch. When you have entered this information, click on the Save
icon. Your new batch name will be added to the list on the Apply Exit
Records screen.

Add Records
After creating your Batch Name, you will create the records
that comprise the batch. Click on the Add Records link next to your new
batch name. The exit data entry window will be displayed. Enter your data for
the first record. Mandatory fields are denoted by an asterisk (*). If you need
to erase what you have entered, click on the Reset icon. This will reset
the screen to blank. When you complete your entry, click on the Save
icon to save this record. Once saved, you can enter another record or you can
close the data entry screen. After creating the records for your file, you can
apply the data to the system through the Apply Exit Records screen.
|
Field
Name |
Required? |
Size/Format |
What
to Enter |
|
BORROWER INFORMATION |
|
|
|
|
SSN |
Yes |
9 numeric characters |
Enter the borrower’s social security number. |
|
Last Name |
No |
20 alphanumeric characters |
Enter the borrower’s last name |
|
First Name |
No |
20 alphanumeric characters |
Enter the borrower’s first name |
|
DOB |
No |
8 numeric characters |
Enter the borrower’s date of birth (mm/dd/yyyy), or click on the calendar icon to enter a date. |
|
Address |
No |
Alphanumeric |
Enter the borrower’s address if it has changed. This will be entered into the system as the Primary address and marked as the mailing address. The existing address will be marked as the Former address. |
|
City |
No |
|
|
|
State |
No |
|
|
|
ZIP |
No |
|
|
|
PARENT INFORMATION |
|
|
|
|
Name |
No |
40 alphanumeric characters |
Enter the parent’s last name |
|
Address |
No |
Alphanumeric |
Enter the parent’s address. This will be entered into the system as the Primary address. |
|
City |
No |
||
|
State |
No |
||
|
ZIP |
No |