![]()
![]()
Import Exit Records
This function is to Import (upload) Customer exit data into CRC from an external file which resides on the CRC server and defined in Administration/System Configuration Parameters/Import-Export. This is accomplished via a two-step process. The first step is to Import (or Upload) an external data file. Once uploaded, the data is then applied to the CRC database using the Apply Exit Records function.
The determination of data to be included in the Import file is based on the number of days set in Administration/System Configuration Parameters/Exit Parameters.
|
Exit Import Parameters |
|
|
Process exit if grad date is within |
days
|
The RPBLMIE Banner Process creates a file which contains all students with a financial aid record and specifies their current status. CRC only brings in to exit those who are not enrolled and those who are enrolled with grad date within the grad date parameter.
Note: Users who do not use an external file can manually add batch files and associated Exit Records using the Apply Exit Records function.
NOTE: Exit data files created outside of CRC must have a specific format. Click on the following link for information about how to set up the file: Import File Formats.
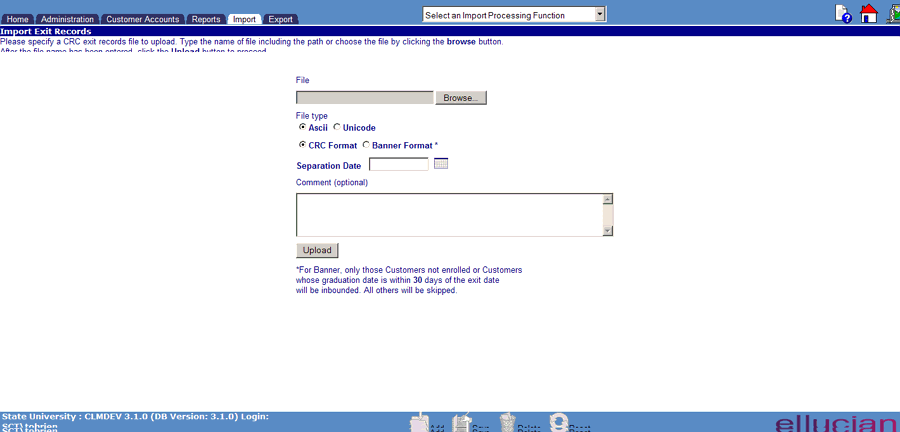
To Import a file, enter or browse for the file name on the Import Exit Records Screen and click on the Upload button. When the upload is complete, you are notified, and the system creates an entry on the Apply Exit Records. Your data is now ready to be applied to the system. Note: You may receive errors.
To Import additional files, click on the Upload Additional Files link. This returns you to the file name entry screen.
|
Field Name |
What to enter |
|
File to Import |
The first step in the upload process is to provide the name of the data file that is to be uploaded; the file name should include the directory name or file access path where the Account is located. The file can be located on any directory or file server that can be reached by the user's client. The following are examples of valid file names: · a:\InboundFile_12132000.Ibx · c:\datafiles\payment_data.Ibx · s:\clm\inbound_files\payments.Ibx Note that all of these examples have a file extension of "lbx". If the file name that is entered does not have an extension of "lbx", an error will result when the Upload process is initiated. The file name can be entered directly into the data entry area. The user can also click on the Browse button to search for and enter the file name. The Browse button is used like the Windows Explorer tool |
| Fyle Type | Select Ascii or Unicde. Typically the file type is Ascii however if you know the file type to be Unicode select Unicode. |
|
Separation Date |
Enter a date to indicate the effective date of non-enrollment. This is used to determine the beginning of a grace period, if applicable, or beginning of repayment status. |
| Comment | Provides for a comment to be entered for each customer in the file. Both a History record and Comment Log entry will be created. |
After the file name has been entered, click the Upload button to continue with the (upload) process. The file name extension will be verified as will the file’s presence at the specified location.
If the Upload process is successful the user will be notified as shown in the following example:

The CRC system will make a table entry to indicate that the specified file was uploaded and awaiting application. See Apply Exit Records for additional information on how to view this entry and how to apply the data contained in the uploaded file.
The user can return to the file name entry screen and provide the names of additional files to be uploaded by clicking the Upload Additional Files link.
The Upload process can potentially result in one of three errors. Each of these is described below.
If the user does not enter a file name and then clicks the Upload button, an error occurs. Reselect Import Exit Records from the Import Processing drop-down list to enter a file name and proceed with the Import process.
If the user provides a file name without an extension of ".lbx", and then clicks the Upload button, an error occurs. The invalid file name is provided to the right of the File: string located in the error message. Click the Upload Additional Files link to enter a valid file name and proceed with the Import process.
If the user provides a file name, and either the CRC system cannot find the file at the specified location, or the file is located but is found to be empty (contains no records), an error occurs. The invalid file name is provided to the right of the File: string located in the error message. Click the Upload Additional Files link to enter a valid file name and proceed with the Import process.
