![]()
![]()
Edit Customer and Account Records Manually
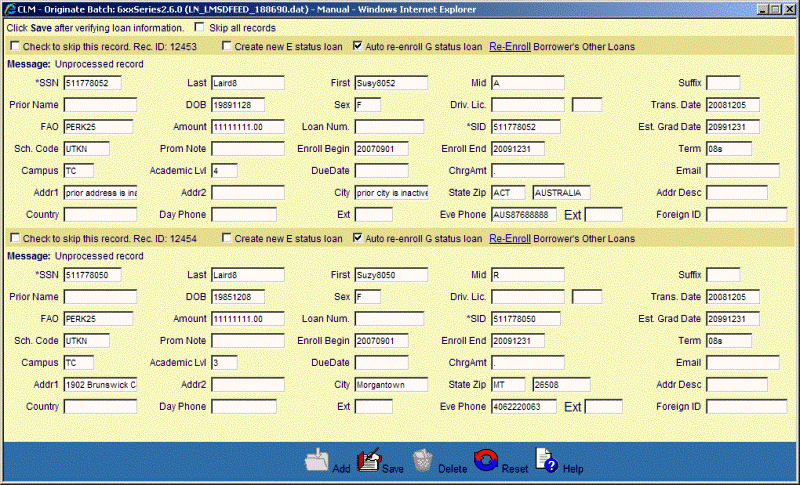
This screen is displayed when the user selects the No option on the Automatic Processing selection line at the top of the Apply Customer and Account Record screen, selects the desired file by clicking in the checkbox located to the left of the file name and clicks the Save icon located in the Function Bar. This function allows the user to manually review, edit and apply Customer and Account records. Note: If there are a large number of records, it is recommended that the user first reviews the records by clicking on the magnifying glass icon in the Apply Customer and Account Record screen.
The screen displays one to two records (each record corresponding to 1 to 5 records from the original Import file) pertaining to a specific Customer/Account that are retrieved from the file and displayed to the user via a new window. The user can edit the record contents by clicking on the appropriate data field and revising the field value. The user can also indicate that a data record should be skipped by clicking on the checkbox located in the upper left corner of the record form. Skipping may prove useful when the user is unable to resolve CRC edit errors, but wishes to continue with the review/edit/apply process. Note: Skipping a record results in the record being retained in the file, unapplied. The number of records skipped will appear on the Apply Customer and Account Record screen.
See Data Entry below to review information pertaining to what values may be entered into the various fields on the Customer and Account Records review/update form. Note: Although listed, you can not change the Customer SSN, Last, First, Mid, Suffix, Prior Name. After the review and edit, click on the Save icon. See Apply section for more details.
*Required Field
|
Field Name |
Format/Comments |
|
Skip Record Indicator |
N/A |
|
*SSN |
Social Security Number. 9 numeric characters. |
|
Last |
Last Name. If present, then name will be used to update the value currently in Customer record. |
|
First |
First Name. If present, then name will be used to update the value currently in Customer record. |
|
Mid |
Middle Name. If present, then name will be used to update the value currently in Customer record. |
|
Suffix |
If present, then name will be used to update the value currently in Customer record. |
|
Prior Name |
If present, then name will be used to update the value currently in Customer record. |
|
DOB |
Date of Birth. If entered, value must have a format of "YYYYMMDD". |
|
Sex |
If entered, value must be "M" (male) or "F" (female). |
|
Driv. Lic. |
Driver's License Number. If present, will be used to update the value currently in Customer record. |
|
Trans. Date |
Transaction Date Format is "YYYYMMDD". |
|
FAO |
FAO Loan/Receivable Name. This is one of the keys used to determine if this record represents a new Loan/Receivable or a subsequent disbursement for an existing Loan/Receivable. |
|
Amount |
Amount of Loan/Receivable. 9 decimal characters with 2 characters to the right of the implied decimal point (positions 33 and 34); right justified. Ex: $2450.50 would be entered as 245050 |
|
Loan/Receivable Num |
Loan/Receivable Number |
|
*SID |
Customer ID |
|
Est. Grad Date |
Estimated Graduation Date. Format is "YYYYMMDD". |
|
Sch. Code |
School Code. Must match to a school code/campus code in Administration/System Configuration/School Parameters. |
|
Prom Note |
|
|
Enrollment Begin Date |
Enrollment Begin Date. Format is "YYYYMMDD". |
|
Enrollment End Date |
Enrollment End Date. Format is "YYYYMMDD". |
|
Term |
Format is "YYYYMM". |
|
Campus |
|
|
Academic Lvl |
Academic Level |
|
Due Date |
Format is "YYYYMMDD". Used to age an Loan/Receivable if past due at origination. |
|
Chrg Amt |
Used to assess an upfront charge at origination. |
|
|
|
|
Add1 |
Address 1.If present, will be used to update the value currently in Customer Address record. |
|
Add2 |
Address 2.If present, will be used to update the value currently in Customer Address record. |
|
City |
If present, will be used to update the value currently in Customer Address record. |
|
State |
Must match a valid state code. If present, will be used to update the value currently in Customer Address record. |
|
Zip |
Format is "nnnnn-nnnn". If present, will be used to update the value currently in Customer Address record. |
|
Addr Desc |
Address Description |
|
Country |
|
|
Day Phone |
If present, will be used to update the value currently in Customer Address record. |
|
Ext |
Daytime Extension. If present, will be used to update the value currently in Customer Address record. |
|
Evening Phone |
Evening Phone. If present, will be used to update the value currently in Customer Address record. |
|
Ext |
Evening Extension. If present, will be used to update the value currently in Customer Address record. |
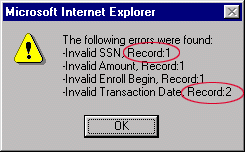
To apply the displayed record(s), click on the Save icon. Clicking the Save icon will trigger an initial edit process that validates the displayed record data. If there are any errors, they will be displayed in a pop-up dialog box. The error message will indicate which record is in error, if more than one record is being applied:

Click on the OK button to acknowledge the errors and return to the review/edit form. The user can either modify the field(s) in error, or indicate that the erroneous record should be skipped (see the Review and Edit section pertaining to skipping records). Once the desired action has been accomplished, again click the Save button.
If the record contents pass the initial edit, a second set of edits is performed as part of the application process. These edits verify the record contents against data currently held in the database. If there are any errors, they will be displayed in a window similar to the original Review/Edit window. The error Message is displayed in red below the Check to skip box as shown in the following example.

Correct the error(s), and then click the Save icon.
If there are not any edit errors, the Customer/Account records will be applied to the database. The review/edit screen will be refreshed with the next 2 record sets in the Import file (if any).
The Review/Edit/Apply process will continue in the manner described above until all records in the import file have been processed. When this occurs, the following message is displayed in a pop-up window.

Click on the indicated link to close the message window and return to the Apply Customer and Account Record screen. This screen is refreshed to reflect that the file was completely processed (the file name is removed).
The user can also terminate the review/edit/apply process before all records in the Import file have been processed. This is accomplished by performing either of the following actions:
· Clicking on the "X" in the upper right-hand corner of the review/edit/apply browser window
· Click on the Apply Customer & Account Records File List screen.
Performing either action will close the review/edit/apply screen. Any unprocessed records, or records processed with errors, will remain in the Import file and the file will remain in the Apply Customer and Account Record screen. The file's Unprocessed Records count will be updated as needed to reflect any records that were successfully processed prior to termination.

The user may override the following default settings:
|
Field Name |
Format/Comments |
||||||
|
Check to skip this record |
Transaction will remain in batch file unapplied until further processing. |
||||||
|
Create new E status Loan/Receivable Auto re-enroll G status Loan/Receivable |
Defaults are based on setting in OM/System Configuration/Loan/Receivable Setup
|
||||||
|
Re-Enroll Customer’s Other Loan/Receivables |
Click to re-enroll any other Loan/Receivables that are not in E or G status. |
||||||