![]()
![]()
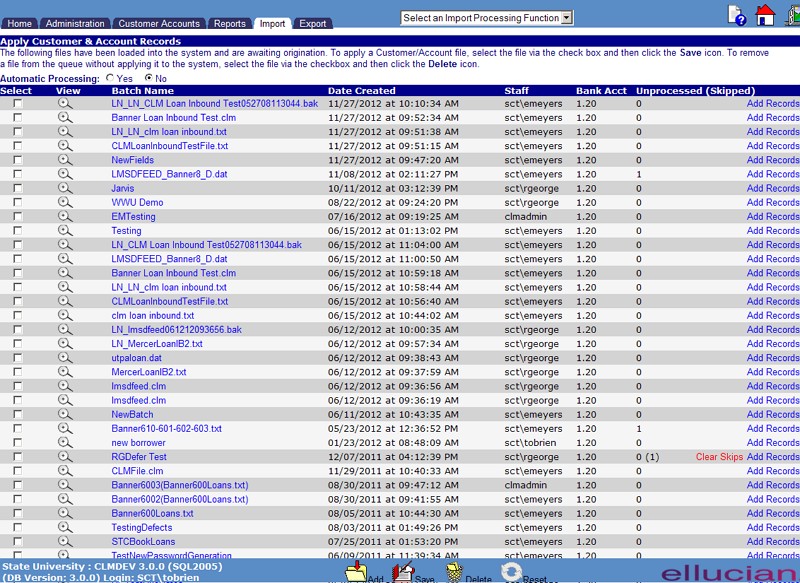
Apply Customer & Account Records
List
This function lists the Customer and Account Record files that have been loaded from the Import Customer & Account Records function. The Apply Customer & Accounts function allows a user to:
· View Customer and Account Records Batch File
· Add New Records to an existing Customer and Account Records Batch File
· Add a New Customer and Account Records Batch
· Load Customer and Account Records Batch File Manually
o Note: if files are loaded manually, a user is allowed to edit individual records before they are applied.
· Load Customer and Account Records Files Automatically
To view the Customer and Account Records, click on the magnifying glass icon and new window opens that displays the records from the batch loaded from the Import Customer & Account Records function. This allows a user to view the Records and determine whether some of them need to be changed. If the user wants to change any of the individual records, the user performs the Load Customer and Account Records Batch File Manually process.
To Add new Customer and Account records to an existing Batch File, click on the Add Records link and a new window opens. See Create Batch Record for details.
As an alternative to Importing an external Customer and Account records file from the Import Customer & Account Records function, the user can manually create a "batch" of Account records. To add a new Customer and Account records batch, click on the Add icon in the function bar and a new window opens. See Create Customer and Account Batch for details.
To process a file Manually, first select the No option on the Automatic Processing selection line at the top of the screen. Next select the desired file by clicking in the checkbox located to the left of the file name. When a file has been selected, click the Save icon located in the Function Bar.
Only one file can be selected for manual processing at a time. If multiple files are selected, or no files are selected, the user will be notified via a pop-up error box. The following is an example of a multiple file selection error:
After selecting a file and clicking the Save icon clicked, a new window opens to Review/Edit/Apply. The window displays up to two records (each record corresponding to 1 to 5 records from the original Import file) pertaining to a specific Customer/Account are retrieved from the file. See Originate Batch: Name - Manual for details. After processing the Customer and Account Records manually, the Unprocessed column and (Skipped) column in the screen is updated. If any records were skipped in the manual process, Clear Skips is also displayed. To clear the records that have been skipped, click on the Clear Skips and the records will be removed and the screen will be refreshed and the (Skipped) column will be blank for that batch file.
To process a file automatically, first select the Yes option on the Automatic Processing selection line at the top of the screen. Next select the desired file(s) by clicking in the checkbox located to the left of the file name. When the desired file has been selected, click the Saveicon located in the Function Bar.
More than one file can be selected for automatic processing. If no files are selected, the user will be notified via a pop-up error box. The following is an example of this error:
After successfully clicking on the Save icon, the CRC system will edit the contents of the selected file(s), and apply valid records to the database. When all files and records have been processed, a Summary Results screen is displayed as shown in the following example:
The processing result for each record set (as indicated by the ID number) is shown. Errors are indicated by a record status that begins with "2" (see red arrow in the above example). Records that were in error are logged on the report, and the record is retained in the Import file, unapplied. These records can be reviewed and edited while in the manual processing mode.
Click on the indicated link to close the message window and return to the Apply Customer & Account Records screen . This screen is refreshed to reflect that the previously selected file or files have been processed. If all records in a file were successfully processed, the file name displays 0 records. If one or more records had errors, the file is retained along with the erroneous records. The record count for such files is updated by reducing the records that were successfully processed.
To delete one or more unapplied Import Customer/Account data files, first select the desired file(s) by clicking in the checkbox located to the left of the file name. When all desired files have been selected, click on the Delete icon located in the Function Bar.
Clicking the Delete icon will trigger the display of a pop-up dialog box that requests the user to confirm the Delete action, and identifies the files that have been selected for deletion. For example:
Click on the OK button to acknowledge the Delete action. The selected files will be deleted, and the pop-up window will be closed. The Apply Customer & Account Records File List will be updated to reflect the deletion.