![]()
To revise or update an existing General Ledger Table Record, select the desired GL record by clicking on the magnifying glass icon located on the left side of the appropriate General Ledger Table Record List line. When this icon is clicked, a new window is opened (see example below) that contains the following:
An update form that is populated with the current information for the selected GL record.
A function Bar that contains Save, Delete and Reset icons.
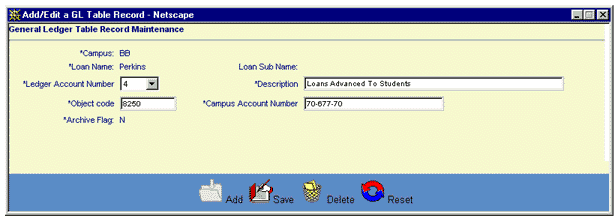
The user updates the GL Table record's information by entering or revising data in the appropriate fields. Note that the Campus, Loan Name and Loan Sub Name fields are read only. The Archive Flag may be updated if the record has been previously marked for deletion. The remaining fields are required entry.
Click on this link: Data Entry and Edit Guidelines to review information pertaining to what values may be entered into the various fields of the General Ledger Table Record Information entry form.
Click on the Reset icon to restore the update form to its initial state. Any fields which were modified or updated by the user will be restored to their initial value, that is the value that was displayed when the update form was first opened.
To save the General Ledger Table Record information, click on the Save icon. The new General Ledger Table Record data will be written to the database and the GL Table Record Information entry/update window will be closed.
To exit this process without saving the General Ledger Table Record information, simply click on the General Ledger Table Record List browser window at any time to close the pop-up GL Table Record data entry/update window.