![]()
![]()
 Mail
Mail
Access the Mail function under the Borrower Services tab when you want to view, edit, or delete the items in the borrower’s mail queue. You can also use this function to add new mail to the queue.
To View the Contents of the Mail Queue
To view the contents of a borrower's Mail Queue, click on the Magnifying Glass icon located on the right side of the Borrower Mail section of the screen. When you click on this icon, a new window displays a listing of all unprinted items that are in the borrower’s mail queue.
Viewing a Mail Item
To view a mail item within the queue, click on the associated Printer icon. When this icon is clicked, a Crystal Reports viewer is opened displaying a read-only version of the document. You can use the control buttons to perform a variety of functions, including paging through the document, printing the document to a local printer, and exporting the document to an external file. Click on the following link for a description regarding the use of the report viewer control buttons: Using Crystal Report Controls
Filtering Mail
The top bar of the mail queue contains three radio buttons as shown below:

The Show All radio button is the default. To view only Letterhead Mail or Non-Letterhead Mail, click the appropriate radio button. This filter may be critical for printing purposes, since letterhead and non-letterhead mail may have different margin settings.
To Edit a Mail Item
To edit a mail item, click on the Edit icon as shown below:

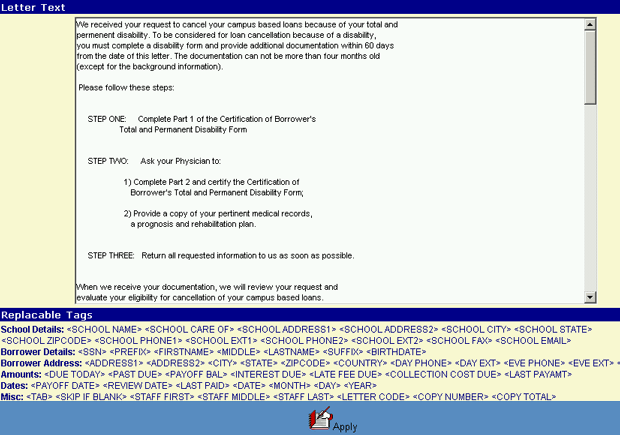
The mail selected will then display as shown below:

Mail can be edited by either typing in text in a free form manner or by using the Replaceable Tags at the bottom of the window. These tags can be either copied into the mail item or manually typed into the letter. If manually entered, care should be taken to ensure that the brackets (<>) are entered before and after the Replaceable Tag.
Clicking Apply will save the letter in its modified form.
To Delete a Mail Item
To delete an item from the borrower's Mail Queue, check the associated box and click the Update/Delete icon.

Click on the OK button to acknowledge the delete. The selected item will be deleted from the Mail Queue, and the Mail Queue List will be updated to reflect the deletion.
To Add New Mail to the Queue
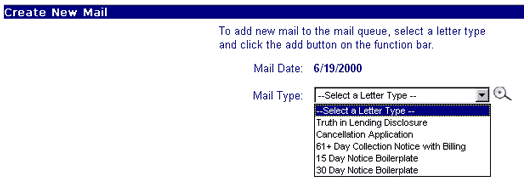
Select the desired Letter type from the Mail Type drop-down list, and
click the Add icon located in the Function bar at the bottom of the
screen. The items that appear in the drop-down list correspond to the letter
types that have been previously input via the Letter
Maintenance function of the Office Management menu selection.

When the Add icon is clicked, the letter text together with the appropriate
borrower data from the CLM database (such as name and address) are merged to
create the selected correspondence. The letter is added to the borrower's Mail
Queue, and the counter located in the Borrower Mail portion of the screen is
incremented. An informational message is displayed indicating the selected
letter was successfully added to the queue.
This process will also generate a History entry (under the Correspondence / Mail category) to record this transaction.
Items in the borrower's Mail Queue will be printed periodically via a batch process. The System Administrator establishes the frequency of this process. Optionally, you can view, export and/or print a piece of correspondence that is in the Mail Queue by using the View Borrower Mail Queue function.