![]()
![]()
Collection Queue Contents
View
The Collection Queue Contents is displayed from the View link in the Collection Queue Maintenance Screen. The Collection Queue Contents function displays a list of the Loan/Receivable currently assigned to the selected collections queue and allows users to:
The Collection Queue Contents Screen includes all Loan/Receivable; the filter (if any) for this queue is not used, as indicated by the selected Filter Off radio button. The number of Loan/Receivable displayed in the initial window will match the Loan/Receivable count shown in the corresponding line of the Collection Queues List display. In order to filter the Collection Queue, the Filter Properties need to be setup or modified by clicking on the Queue Filter button and a new window. Once the Filter Properties are set up, click on the Filter On radio button and the Collection Queue will be filtered.
When a Collector selects and works a Customer Loan/Receivable from one of the Collection Queues, the Loan/Receivable for that account (that are in a Collections-status) are "locked" by CRC with the user's internal CRC ID. This lock will indicate the Loan/Receivable is being worked by any other Collector. It is possible to remove the lock from one or more Loan/Receivable by using functionality of the Collection Queue Contents window.
In the following example, two Loan/Receivable displayed in the Sample Collections Queue are locked by user sct/tobrien:
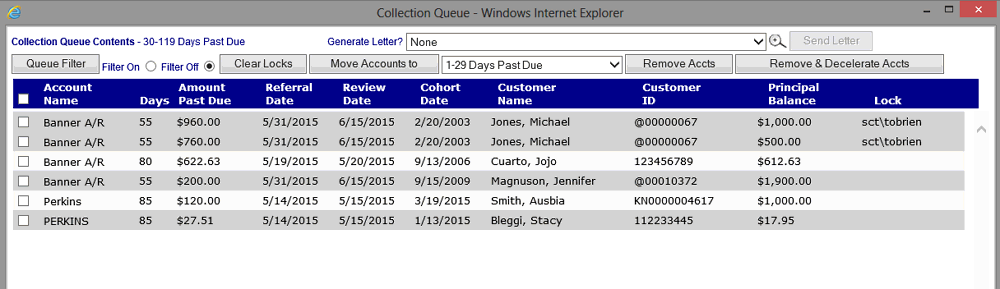
To remove the lock from one or more of the Loan/Receivable, first select the desired Loan/Receivable by clicking the appropriate checkbox next to each Loan/Receivable, or by clicking the checkbox located in the display heading (next to "Loan/Receivable Name") to select all the Loan/Receivables.

Once the desired Loan/Receivables have been selected, click the Clear Locks button. When this button is clicked a pop-up confirmation window will be displayed. Click on the "OK" button to proceed.

When the "OK" button is clicked the locks will be removed, and the Collection Queue Contents window updated to reflect the lock removal:
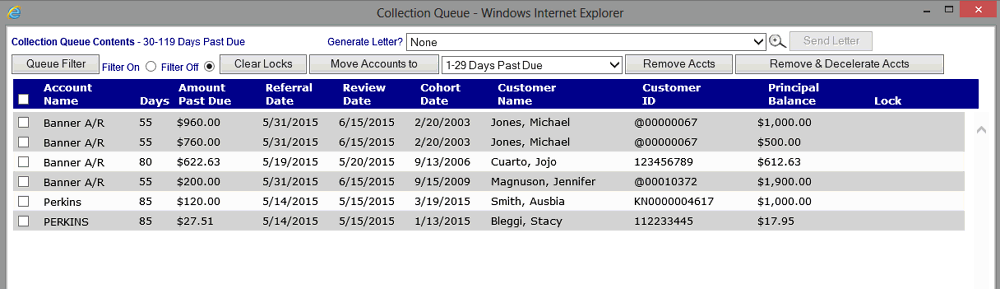
The unlocked Loan/Receivables are now available to be worked by another Collector.
Loan/Receivables can be moved from one Collections Queue to another. This ability is particularly useful when the user desires to move a Loan/Receivable or Loan/Receivables from a System Collection Queue to either a Custom Collection Queue or an External Collection Queue.
Once Loan/Receivables are moved to a Custom or External Collection Queue, they will remain there until removed from Collections or moved to another collections queue. Loan/Receivables that have been moved to a Custom queue will remain in that queue until the Loan/Receivable balance falls equal to or below $0.00 at which time the Load Collections Queue process will remove them from the queue. Loan/Receivables that have been moved to an External queue will not be affected by the Load Collection Queues process. While Loan/Receivables can be moved by a user from one System queue to another (for example from the 30-59 day queue to the 120+ day queue), the affect is only temporary. When the Load Collection Queues process is next run, the process will return the Loan/Receivable to the appropriate System Queue.
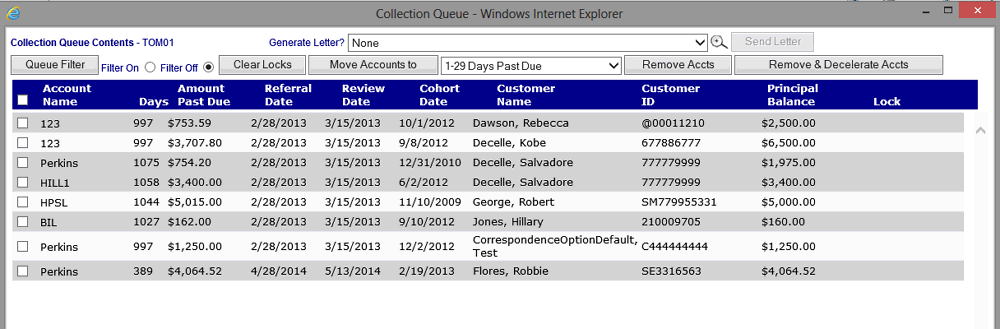
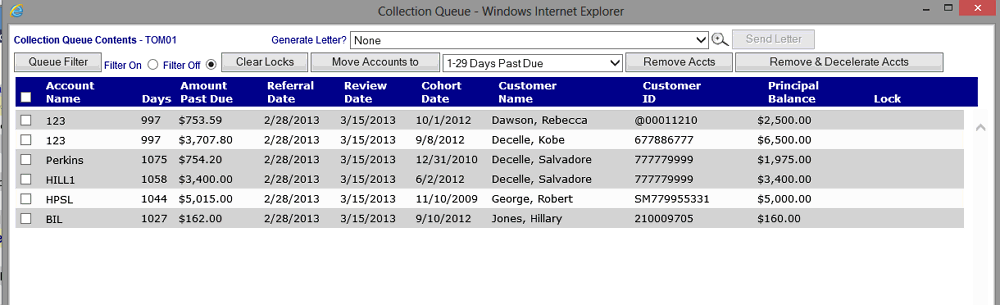
In the following example, the following 8 Loan/Receivables are displayed in the selected Collections Queue:
To move one or more of the Loan/Receivables to another queue, first select the desired Loan/Receivables by clicking the appropriate checkbox next to each Loan/Receivable, or by clicking the checkbox located in the display heading (next to "Loan/Receivable Name") to select all the Loan/Receivables. Next, select the desired collection queue from the drop-down box located to the right of the Move Loan/Receivables button.
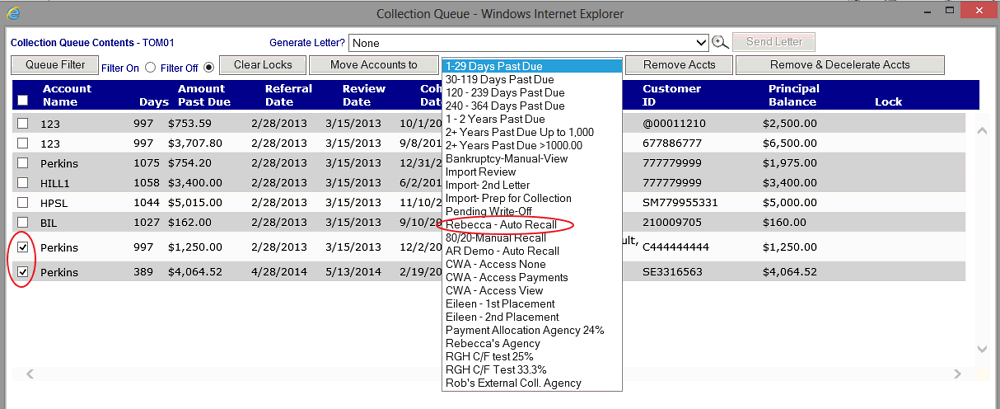
Once the desired Loan/Receivables have been selected, click the Move Loan/Receivables button. When this button is clicked a pop-up confirmation window will be displayed. Click on the "OK" button to proceed.
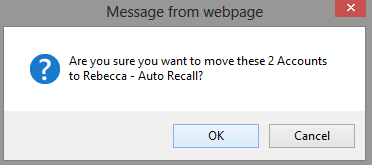
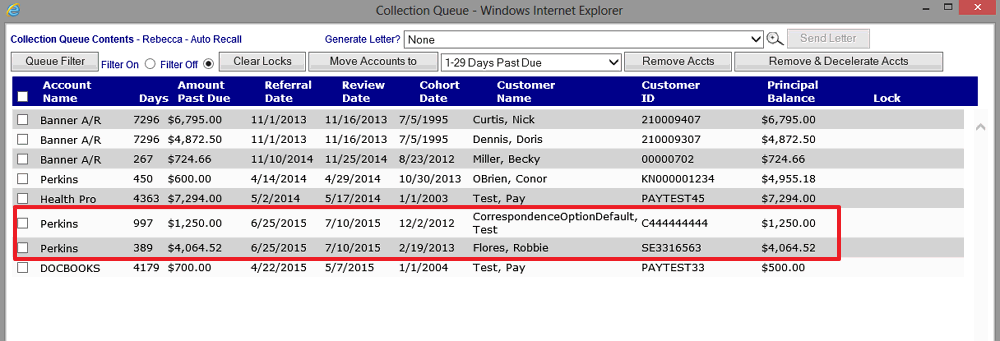
When the "OK" button is clicked the Loan/Receivables will be moved to the destination queue, and the Collection Queue Contents window updated to reflect the Loan/Receivable transfer:
Select the View function for the destination collection queue (from the Collection Queues List window) to see that the Loan/Receivables have been moved:
©Ellucian Campus Receivables Collector Help Center