![]()
![]()
Loan Receivable Details
Exit
This screen is displayed when selecting the Exit component in the Loan Receivable Details List screen. This selection provides access to information pertaining to the selected Loan/Receivable's exit process. This information is populated by performing the Exit function from Customer Services/Exit a Loan/Receivable or Import-Apply/Exit Records. The provided data may be updated as needed.
When the Exit option is selected, the Loan Receivable Details – Exit screen opens that contains the following:
· A form that is populated with information from the associated Loan/Receivable Exit record.
· A function Bar that contains Add, Save, Delete and Reset icons. The Add and Delete icons are disabled.
To Edit a Loan/Receivable Ledger, follow the Data Entry below.
*Required Fields
|
Purpose/Usage |
|
|
By Whom |
Read-only Internal CRC identifier of the person supplied the exit information. |
|
Interview Method |
How the exit interview was conducted. . Informational purposes only. |
|
Where |
The location the Loan/Receivable was exited at/from. Informational purposes only. |
|
Highest Academic Level |
Represents level of student at time of separation. Default is set to the sort order of coded data value for ACADLVL. May be updated. Informational purposes only. |
|
Prepared Date |
The date the exit process/materials were prepared. System input from the Exit process function. Informational purposes only. |
|
Completed Date |
This date represents the Customer’s completion of exit interview documents through Customer Web Access. Optionally, this date may be manually entered or removed. |
|
Form Printed Date |
Optional input. |
|
Incomplete Date |
This date represents the availability of exit interview through Customer Web Access e-exit process. Upon Customer’s completion of e-exit documents, the Completed Date will be populated. |
|
*Separation Date |
The effective date from when the Loan/Receivable is no longer considered as Enrolled Status. The day following this date begins either Grace or Repayment. |
|
*Repayment Begin Date |
The day following the expiration of a grace period or the date an Loan/Receivable is placed in Repayment status. The due date will then be the next system-specified due date following the repayment begin date (i.e. Rpmt begin 9/26, Due date 10/01). |
|
*Scheduled Payment End Date |
Calculated based on the ‘Minimum Payment Amount‘ provided on the Loan/Receivable’s Note Maintenance Parameters, this represents the amortized scheduled end of the repayment period. |
|
*Max Payment End Date |
Calculated from the ‘Max Repay Mos’ provided on the Loan/Receivable’s Note Maintenance Parameters, this represents the maximum scheduled end of the repayment period. |
|
Archive Flag |
Read-only. Indicates if this record has been deleted. |
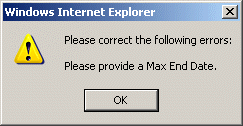
Clicking the Save icon will trigger an edit process that validates the user-entered data. If there are any errors, they will be displayed in a pop-up dialog box as shown in this example:

Click on the OK button to acknowledge the errors and return to the entry form. Modify the field(s) in error and again click the Save button. If there are not any edit errors, the updated Loan/Receivable information will be written to the database, and the pop-up update window will be closed. The Loan/Receivable List will be updated (if appropriate) to reflect the revised Loan/Receivable information.
The displayed Loan/Receivable information can be changed but the Exit record can not be deleted. The Delete icon will be grayed-out.
The user can select another Loan/Receivable and perform the previously selected component maintenance function by clicking on the Go button in the Loan Receivable Details List screen.

©Ellucian Campus Receivables Collector Help Center