![]()
![]()
Exit
This function allows a user to process exits on ALL Loan/Receivables for a customer providing for amortization across multiple loans and allocations of installment payment amount. Loan/Receivables are generally exited via the Import/Exit Records function.
When an Loan/Receivable is "exited", it is moved from an "enrolled" status to a "grace" status, in preparation for repayment. This process establishes the Loan/Receivable repayment schedule (payment amount, due date, etc.) and generates the required documents for Customer notification .
Federal Loan guidelines stiplulate the minimum payment amount across ALL Loans in the fund. To appropriately pro-rate the amount and amortize repayment, the loans must be exited simultaneously either through the Customer Account function Exit or through the Import/Exit.
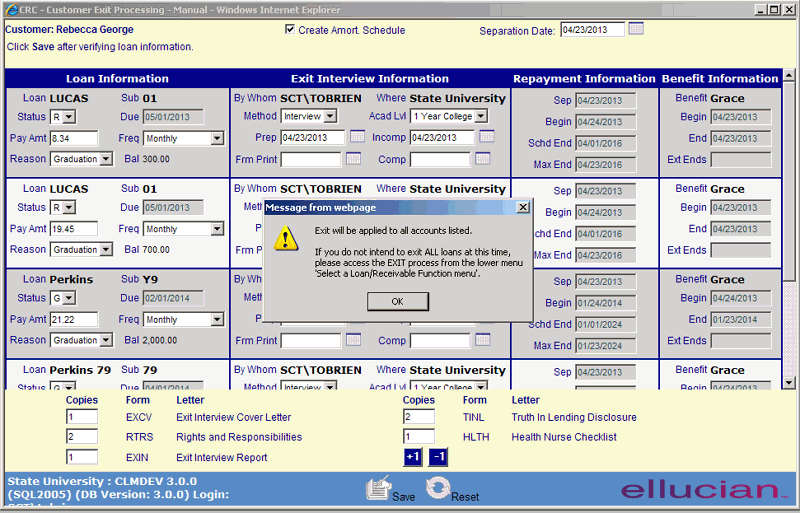
The Customer Exit Process Screen consists in part of an entry form for providing information associated with the Exit process. The screen also provides the user with the capability to "print" various Exit-related documents. When the Print flag for a document is set to "Yes", the indicated number of copies is placed in the Customer's Mail Queue
Edit the appropriate fields following the Data Entry guidelines below and then click on the Save icon in the function bar. The window closes and returns to the Loan grid. Note; - there can be errors (see Save Error for details).
|
Field |
Purpose/Usage |
|
Loan/Receivable Information |
|
|
Loan/Receivable Name |
Loan/Receivable currently being exited |
|
Sub Name |
Loan/Receivable currently being exited |
|
Status |
Current status of Loan/Receivable |
|
Due |
Current due date of the Loan/Receivable prior to exit |
|
Pay Amt |
The minimum payment amount established by terms of the note |
|
Freq |
Repayment frequency established by terms of the note |
|
Reason |
Select from drop-list |
|
Bal |
Current Loan/Receivable balance |
|
Exit Interview Information |
|
|
By Whom |
Defaults to the user performing the exit function |
|
Where |
Defaults to the school for which the Loan/Receivable is issued |
|
Method |
Select from drop-list |
|
Acad. Level |
Provide Customer’s academic level at time of separation |
|
Prepared |
N/A |
|
Incomplete |
Default to current date; sets availability of e-exit for BWA |
|
Form Printed |
N/A |
|
Completed |
N/A |
|
Repayment Information |
|
|
Sep |
Enter the effective date of Exit |
|
Begin |
Day after grace period ends; Loan/Receivable enters Repayment status |
|
Schd End |
Calculated date of last payment based on Loan/Receivable amt, installment amount, and number of installments |
|
Max End |
Calculated last date allowed for payment based on terms of Loan/Receivable note for maximum repayment months. |
|
Benefit Information |
|
|
Benefit |
Default to Grace |
|
Begin |
Day after separation; Loan/Receivable enters Grace Status |
|
End |
Last day of specified benefit |
|
Exit Documents |
|
|
Copies |
Select number of copies to print; Default is established in Administration/System Configuration- Exit Parameters |
|
Form |
Letter code from Administration/System Tables-Letters and Forms |
|
Letter |
Description of corresponding Form |
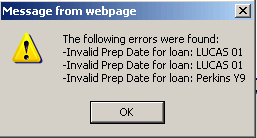
To exit the Loan/Receivable, click on the Save icon in the function bar. Clicking the Save icon will trigger an edit process that validates the user-entered data. If there are any errors, they will be displayed in a pop-up dialog box as shown in this example:

Click on the OK button to acknowledge the errors and return to the entry form. Modify the field(s) in error and again click the Save button. If there are not any edit errors, the Loan/Receivable exit data will be saved, and the appropriate correspondence added to the Customer's mail queue. The Loan/Receivable Summary display will also be updated to reflect the new Loan/Receivable status.
