![]()
![]()
Add a Loan/Receivable
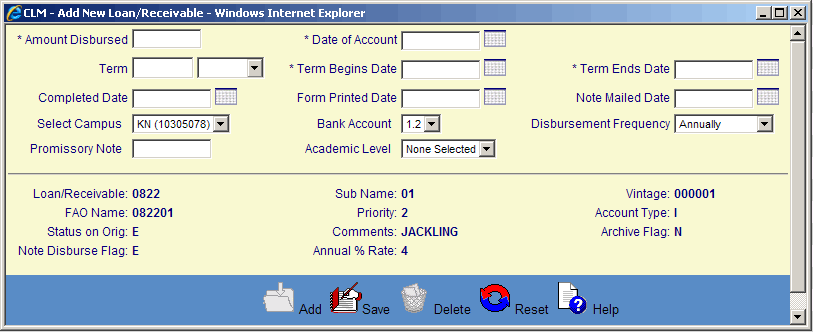
The Add a Loan/Receivable screen is displayed when the user clicks on the Add Loan/Receivable in the Add a Loan/Receivable List screen for a Loan/Receivable that does NOT have a “R” Status in Orig. column (Repayment). If the user selects an “R” (repayment) Loan/Receivable, the Add a Loan/Receivable Repayment Screen is displayed.
Follow the Data Entry guidelines and then click on the Save icon in the function bar and the Customer Account Grid is redisplayed with the new Loan/Receivable (note: you may receive an error). If the Customer has one or more Loan/Receivables that can be re-enrolled (based on Loan/Receivables Definitions parameters), the screen below is displayed when you click on the Save icon. Click on the OK button and the Re-enrollment screen is displayed.

If the information is not entered correctly, the user may receive an error message (see below). Click on the OK button and update the information and click on the Save icon.

*Required Fields
|
Field |
Purpose/Usage |
|
*Amount Disbursed |
Enter the amount of the Loan/Receivable to be added. |
|
*Date of Loan/Receivable |
Enter the desired ‘effective date’ for the Loan/Receivable. |
|
Term |
Enter value in the space provided. Max 6 characters |
|
*Enrollment Begins Date |
Provide the Begin date of the term for which the Loan/Receivable applies |
|
*Enrollment Ends Date |
Provide the End date of the term for which the Loan/Receivable applies |
|
Completed Date |
N/A |
|
Form Printed Date |
N/A |
|
Note Mailed Date |
N/A |
|
Select Campus |
Select Campus for which this Loan/Receivable applies |
|
Bank Account |
Cash Clearing account for Disbursement. Default is the account established in Administration/ System Configuration/ Loan/Receivable set-up. |
| Disbursement Frequency |
N/A |
|
Promissory Note |
N/A |
|
Academic Level |
Select from drop-down list. |
|
Loan/Receivable Information |
Displays the details of the type of Loan/Receivable selected. |

©Ellucian Campus Receivables Collector Help Center