![]()
![]()
The initial screen that is displayed after the user has selected the Customer Services tab from the Main Menu is to Find a Customer. After selecting a Customer, a new screen is displayed that contains the Customer information and Loan/Receivables and when a user selects a function from the drop-down box in the Navigation Bar the Customer information remains and the Loan/Receivable section is replaced with the appropriate function information, or the function creates a pop-up window. To return to the Loan/Receivable information, the user clicks on the Loan/Receivables link in the top left portion of the Customer information under the Customer ID or the Loan/Receivables function in the drop-down box in the Navigation Bar. A user can also access Customer Information by clicking on the links in the same section (click on the items below for details) or the user can select the function in the drop-down box in the Navigation Bar.
· History
· CallLog
· CollStatus (popup window, see sample below)
· TRA
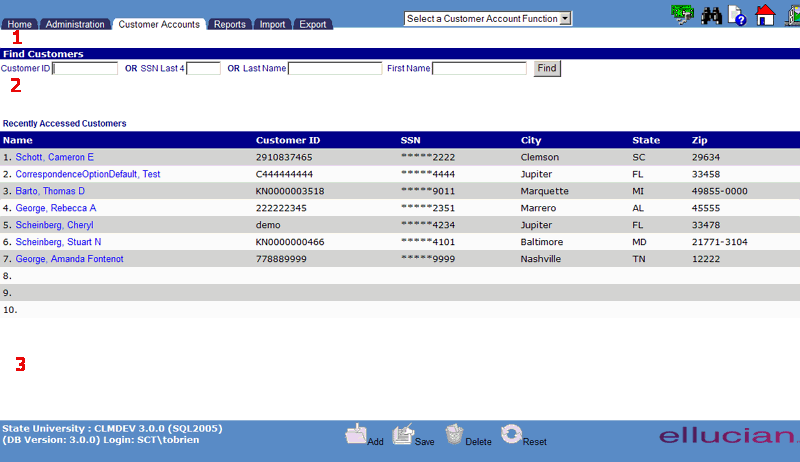
The initial Customer Services screen will have the following format:

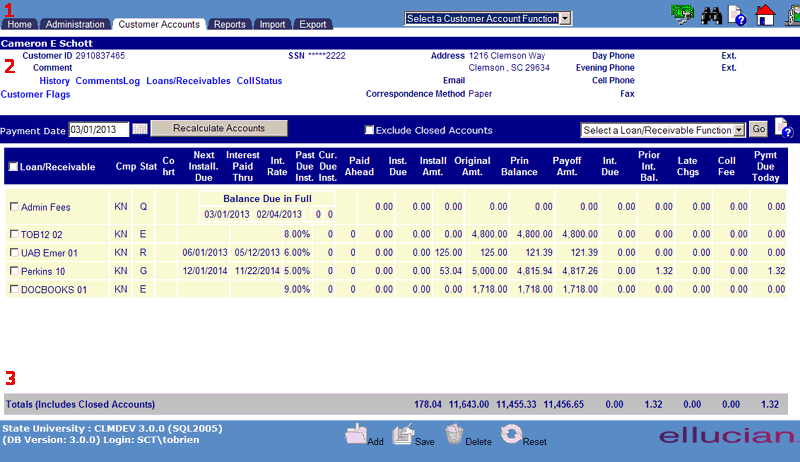
After selecting a Customer the screen will have the following format:

The Navigation Bar (item 1 in the above screen sample) contains four icons. The purpose of each is described in the table below.
|
|
This icon will appear only if you have been provided with Collector privileges. Click on this icon to view the Collections Queue |
|
|
Clicking on this icon will redisplay the Customer Selection screen. When on another Customer Services screen, click on this icon to search for another Customer to work with. |
|
|
Clicking this icon will open a window that displays the help page related to the screen that is displayed. The default help for the Customer Services Tab screen is the Customer Services Functions Overview. Note: Call Log is the only function that has the help icon displayed within the main screen. |
|
|
Clicking this icon will allow the user to Exit the CRC application. |
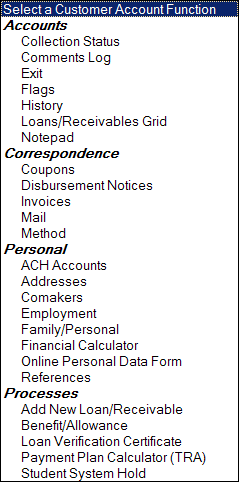
The Navigation Bar also contains a drop-down box of the available Customer Services functions. Clicking on this box will present a list of functions, any one of which can be selected (depending on the user's security profile) to access the indicated function.

Each of these functions is further described in the chapter entitledCustomer Services Functions Overview.
The Contents Area (item 2 in the above screen sample) initially displays Find Customers (See Find Customer for more details). After selecting a Customer, the Contacts Area displays the Customer information and Loan/Receivables (item 2 in the above screen sample).
The Function Bar (item 3 in the above screen sample) contains "grayed-out" (non-functional) icons for the Add, Save, Delete and Reset functions. One or more of these icons may become functional once a Customer Services Processing function has been selected from the drop-down box found in the Navigation Bar.

©Ellucian Campus Receivables Collector Help Center